Saturday, March 26, 2011

Lydia's Room

 I just made this cute tree out of fabrics left over from Lydia's quilt. I got the idea from trendypeas.com. I bought this frame a long time ago to use the glass for something else. When I got it home the glass was hot-glued into the frame and I broke it trying to get it out. I painted it pink and made a canvas using cardboard, posterboard, spray adhesive, and fabric. Then I attached all of the pieces using fusible webbing.
 Don't mind the black-out curtain-I'll do anything for a few extra minutes of sleep. I made the curtain using a tutorial from makeit-loveit.com, but you won't find it as a curtain, the tutorial is for a shower curtain. I think it could be longer, but I don't have any other coordinating fabrics.
 I found this blue rocking chair and a garage sale a few years ago. Someday I'll refinish it, but it works for now. The dresser I refinished here. The lamp was stolen out of Logan's room and I recovered the lamp shade with coordinating fabrics. (I bought the quilt fabric in 2007? and didn't buy any extra. I had to comb through the fat quarters at Porters to find a few that matched and then do an extensive online search to find a couple yards for the curtain and crib bumber (not shown)). I found the sweet birdcage at DI last week. It had nasty Christmas foliage in and I almost didn't see it. It is a creamy color, so I might spray paint it, but it is a nice contrast to the white dresser so it might stay creamy. I found the green clock and the bird in the cage at Real Deals.
This wall is still a little boring, but I still like it. This is the dress she wore at her baby blessing, it also happens to be the dress I wore when I was a baby. The shelf I already had, I think it's from Target, and the vases were found at DI. On the last wall next to her closet is the changing table and a bow holder that I made. I didn't take a picture of it because, well, that's where I put all the junk that was in the room before I took these pictures.
I don't think this room and 100% yet, but I am loving it. I was really nervous after I painted the walls that I wouldn't like the color, but it has grown on me and is a nice backdrop for the white furniture. Any comments or suggestions would be appreciated.

Wednesday, February 9, 2011

Thank You card turned Wall Art

I recently changed up the decor in my living room (thank you new couches) and had a bare spot I desperately needed to fill. As I was cleaning off my fridge, I almost threw away this thank-you card when I realized it was the same colors as my new living room. I set it aside for a few weeks before I got brave enough to try what I had in mind.
Finally I bought the paint and decided to go for it. I had a 16x16 canvas hanging around that I bought more than 2 years ago and hadn't done anything with. I decided this would be my canvas. So I scanned in the thank-you card, resized it in a photo-editing program and edited out all of the leaves and background. Then, since I don't have a silhouette (sigh) I printed the design backwards directly onto the back of some vinyl. (Cheap roll stuff you can buy at craft stores) Then I cut out the design and applied the vinyl to my pre-painted canvas.
And started painting
Ta-da! The first layer is finished
I did a similiar process with the leaves, but I didn't take pictures. I ended up painting them twice because I didn't like the first green color that I mixed. I also did a stencil for the leaf centers, but instead of cutting out 9, I just kept using the same one.
I tried two different birds, but settled on this one. Instead of painting in on, I decided to modpodge. Oops! The mod podge was a bit messy and I forgot that it had a glossy finish. I'm not sure what to do about it right now, but I hung it up anyways. Besides that, i really like how it turned out.

Monday, December 6, 2010

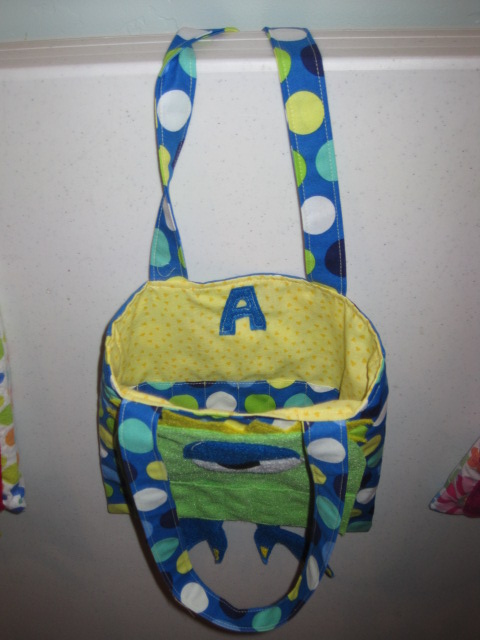
Monster Bags

If you haven't been to Ucreate with Kids, you should check it out. I mostly like to look, but sometimes things stick in my head and we actually do them. These fall leaves were really fun and I had everything on hand. I forgot to take a picture, but we made enough to hang in the front entry and even my super artistic brother-in-law asked how we did them.
I found this adorable monster bag tutorial and decided to make it on the spot. The red one is Logan's and even though it somehow turned out really small, Logan loves it. He helped me choose the colors and glued the eyes together. The little pockets in the front hold crayons and markers and we put snacks and paper inside. It's perfect to take to church or in the car. His cousins were intrigued with his monster bag so I decided to make them each one for Christmas. I think they turned out pretty cute.

Sunday, October 31, 2010

Halloween Crafts

I wanted to put something in these frames, so I googled around for a while and found frankenstien at this website and adapted him a little. I can't remember where I found the idea for the mummy, but if I did him over again I would tear the paper instead of just cutting it.
*They are both 5x7*
I wanted to do something with the kids silhouettes, and this is what I came up with. I took their profiles, added horn to Logan's and a hat to Lydia's, then printed them out on the opposite side of my vinyl. (If only I had a silhouette:() That way I could cut out the image. I put them on the glass in these shadow box frames with spooky paper behind and I think it turned out cool.
*These are 5x5*

This one doesn't look very exciting, but it filled the space I needed it too. I found a scrap of wood and painted the edges black and orange, then printed out the wording directly onto the orange paper and mod podged it onto the wood.
 

Thursday, September 2, 2010

Birthday Shirts

 I decorated this shirt for Logan's second birthday. I found the red tee at DI but it was longsleeved. I shortened them, then cut out the number and letters from felt. I took this picture the day I tore off the design and turned it into a USA shirt for Independence Day:
For his third birthday I tried my hand at freezer paper stenciling. I cut the letters out of freezer paper using the Cricut and went to work. (All this on his actual birthday) I didn't wash his shirt beforehand, but next time I will. The paint cracked after washing the shirt and I think that's why. On the back it says, "What's your excuse."

Friday, August 27, 2010

Lydia's Dresser

Theron's grandparents rescued five of these dressers from the apartments they used to own. Until recently, this one was sitting in their garage storing odds and ends most people wouldn't consider saving. I have been waiting for the renters to move out so I could go and save it.
The hardest part about refinishing old dressers is the non-standard hole centers on the drawer pulls. I decided (a little late) to fill the holes and drill new ones so I wasn't limited to one style of pull. I also filled the center hole on the top drawers because knobs aren't cheap.
First coat of primer. I ended up priming at least twice and then three coats of paint. I meticulously sanded between every coat. The top could probably use another, but its good enough for me.
Logan wanted to paint, so I gave him the awesome responsibility of painting the back. He loved it!

All finished with the new hardware. I ended up going to eBay for the knobs and pulls and am happy with the result. I think I should have sprung for two more knobs, but Theron thinks it would have been too much. Really he just doesn't like me second guessing myself. :)
What do you think? It's for Lydia's room and I'm going for a shabby-chic look. Should I sand down the edges? Add two more knobs? Or just leave it alone?

Monday, November 2, 2009

A desk & a quilt

Here is the desk we refinished. I had great plans to stain the wood, but it turned out to be somewhat damaged and not that pretty. Theron was quite happy to paint it Eagle's colors and is going to get a vinyl Eagle head for the top.
Here is the quilt. I bought the fabric forever ago (a charm pack) and started it when I was pregnant with Logan. I wanted to stipple the quilting, but decided just to do a grid. Once I went one way across the quilt it took me two weeks to work up the courage to try the cross way. Its not perfect, but I love how it turned out.